

How to Detect Leaks and Cracks in your Swimming Pool
It’s just natural that your pool will lose some water through evaporation, splash-out and wastewater from backwashing and then gain water from rainfall, but if you find that you’re having to add more than 6cm of water to your pool each week, then your pool probably has a leak that needs some immediate attention.
How do pool leaks start?
As pools get older, sealants used to make them watertight deteriorate, their plumbing shifts and settle, and natural wear and tear can all cause your pool to leak. A leak can begin at any of the fixtures, accessories, plumbing, or lining of your pool so it’s important that once a leak has been identified, that it is fixed as soon as possible. A leaking pool, if left unrepaired, not only costs more to maintain but over time will cause structural damage by eroding the supports for the pool walls and any other structures that surround your pool.
The 5 Most Common causes of Pool Leaks
Mechanical Issues
AUTOMATIC WATER FILLER
A drop in water level as the result of a leak is much harder to detect in a pool fitted with an automatic fill device, and it is only once you review your water and chemical usage over a long period that evidence of a leak will become apparent. Therefore the best indicator that a pool in such a case is leaking is a recurring problem with excessive algae growth. These algae blooms are caused by fluctuations in the chemical balance, due to treated water being lost through the leak and untreated water being pumped in, thus diluting the chemical level in the pool.
Structural Damage

Leaks due to structural damage can occur anywhere in your pool. If you can see a crack, make sure to investigate it to see if you are losing water. It’s common for structural leaks to occur around fixtures such as lights, valves, aimflows and weirs. You can test if you have a structural leak by conducting a dye test using the ink method.
Plumbing
Leaks in the plumbing of your pool are not only the most difficult to diagnose but the most costly to repair, as the damage caused by plumbing leaks can have a knock-on effect on the structural stability of the pool. There are a number of factors that can cause a leak in the plumbing of your pool such as corrosion, movements in the soil, and wear and tear in the joints of the pipes.
Broken Pipes
RETURN LINE
Leaks on the return line occur when the pool and the pool return pipes settle in the ground at different rates, resulting in a leak where the return line meets the pool wall and joins the aimflow.
SUCTION LINE
The underside of a pool skimmer connection point is hard to get to as it is often encased in concrete on all sides. Leaks on the skimmer pipe require professional equipment as well as a well-trained ear to detect.
The most obvious sign that your pool skimmer is to blame for your water loss is that once the water level is below the skimmer, the leak stops. You can test if the skimmer is to blame by doing a simple bucket test. (see the section, ‘how to test for a leak’.)
Loose or Broken Fittings
Breaks, cracks, or collapses in the plumbing of your pool can happen anywhere, but they are most likely to be where joint connections have been made.
How to Test for a Pool Leak
The Bucket Method

What You’ll Need:
Plastic bucket
Permanent marker or water-proof tape
Place the empty bucket in the water on the second step of your pool. Fill the bucket with water to match the pool’s water level (you can place a brick within the bucket to sturdy it before adding the water). Using the marker or waterproof tape to mark the water level inside the bucket.
Turn off the pool pump as well as any other auto-refill device you may have.
Wait 24 hours and compare the pool water level to that of the bucket. If the pool level is now lower than the level in the bucket, you likely have a leak.
To narrow down the possible source of the leak, repeat the test for another 24-hour period, this time with the pump on.
If the water loss in the pool is greater with water circulating under pressure, the leak is most likely somewhere in your pool’s plumbing.
The Ink Method
What You’ll Need:
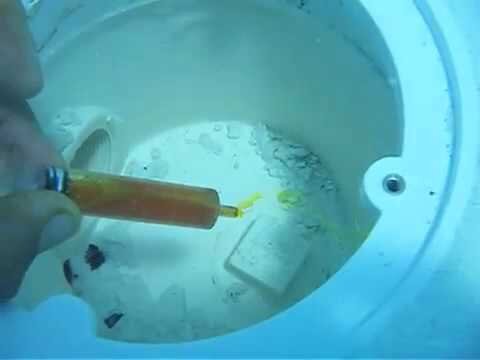
A pair of leak-proof, anti-fog goggles
A snorkel
Leak Finder Dye, or dark food colouring
Check the ground and walls around the pool for any wetness. This will help determine the area of the leak once the water in your pool has reached a level at which it stops draining. Now you know the height of the leak and the approximate location. Now it’s time to jump in the pool and find the exact location of the leak with the dye.
Go to the area where you think the leak might be. Move slowly and try not to disturb the water. Squirt the dye in the water close to the wall. If the leak is near, you will see the dye move towards the leak source like a current. If you suspect your leak is at the bottom of your pool, put on those goggles and do the same thing.
How to find a Leak in your Swimming Pool
DOES THE POOL ONLY LEAK WHEN THE EQUIPMENT IS ON?
This could indicate a pressure-side return leak. When the pump is on, the plumbing is under pressure which can cause small drips in the plumbing to turn into spraying gushers. While the pump is on, look around your yard for wet spots between your pool and where the plumbing is returning the water. A wet spot in this area could indicate a leak in the underground plumbing.
DOES THE POOL ONLY LEAK WHEN THE EQUIPMENT IS OFF?
This usually indicates a leak on the pipes that bring water from the pool. When the pump is on, the plumbing is under a vacuum, this means that air will be drawn in through places that would otherwise be leaking. If this is the case, you will notice air bubbling in the pump basket, return lines or a repeatedly built up of air inside the filter tank.
DOES IT LEAK ALL THE TIME?
This could mean that the pool lining is the source of the leak. Look for gaps in the plaster, fallen tiles, or cracks in the lining. The most common place for these types of leaks to happen is between the plastic skimmer and the concrete pool. If you see anything that resembles a crack, conduct a dye test with the pump off and water still to see if the dye is sucked into the crack. Check any fixtures below the waterline as these can and do leak as well.
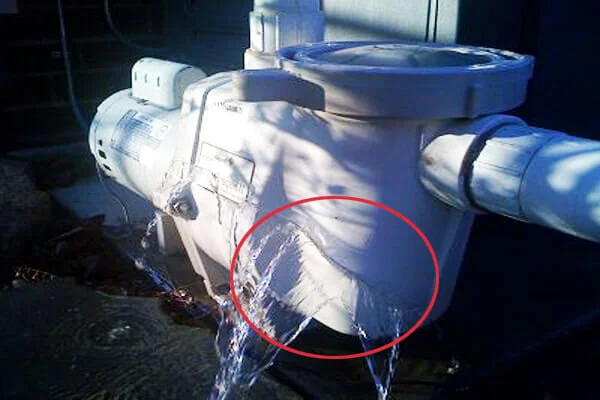
IS THERE WATER ON THE EQUIPMENT PAD?
Look closely at the filter, pump, heater, and valves. Check the ground for moisture. Turn the pump on and off looking closely for spraying water when the pump is turned off. A small drip or two will not be the source of the leak. If loss of water level is noticeable in the pool, it won’t be a drip, but a trickle at least.

DOES THE WATER STABILIZE AT ANY PARTICULAR LEVEL?
If the water stabilizes at any specific level, inspect any elements around that level such as wall fittings, steps, or lights and conduct a dye test. If you notice any sand in a particular area of the pool, this could also indicate the location of the leak as debris can often be sucked through the cracks in a pool wall.
ARE THERE ANY WET AREAS AROUND THE POOL?
Take a walk around the pool area and make note of any wet areas that you come across. If your pool has a downhill slope near the pool, walk down and see if you can notice water accumulating. Wet or eroded spots near your pool are all good indicators of a leak.
Basic Pool Leak Fixes
Pool Lining Leaks
To repair leaks caused by cracks or gaps near pool fixtures such as light or jets, you can apply silicone or pool putty to secure the water and stop the leak.
Skimmer Leaks
A temporary fix for a leak in the skimmer is to patch it with silicone or pool putty but in most cases, the only permanent fix will be to completely replace the skimmer.
Plumbing and Equipment Leaks
If you think there is a leak in your plumbing or equipment, it’s best to call a professional, as these types of fixes require specialized knowledge and equipment to do correctly and could involve replacing pipes or completely overhauling a pump.